T5.1 Parasitic Drain Fuse SB12

I dont actually use the van sat nav as its well out of date. I use google maps on android auto and bluetooth to the car audio. So I guess i could disconnect this? Assume it will plug into the head unit
 
According to @sidepod wiring diagram there are 2 fused supplies to the switch SB12 and SB22.
What happens if you remove SB22 but not SB12?
I'll try again later. Its a small 7.5 amp in the middle row. I did check all the fuses but its worth double checking thanks.
 
I dont actually use the van sat nav as its well out of date. I use google maps on android auto and bluetooth to the car audio. So I guess i could disconnect this? Assume it will plug into the head unit
Yes. Should plug into the back.
 
I assumed if Charlie removed the switch he would've removed connector T10 which also includes the SB22 feed?
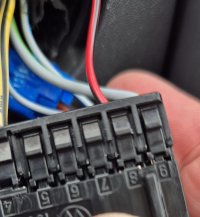
 
I assumed if Charlie removed the switch he would've removed connector T10 which also includes the SB22 feed?
Just to clarify I removed the switch by pushing it in on off then turning to dipped and pulling the switch unit out. I then uncoupled the electical connector and retested the draw
 
Couple of updates. I retested the draw on the battery with fuse 12 removed and it was Zero. Put the fuse back in and its back to 130mAmps. One thing on the light switch. When I removed it I just take it from the housing and disconnect the switch from the wiring block. So wouldnt this still be connected to the battery as the fuse wire is part of it? Im assuming its the red and black lead on number 8 connection. So my next question if this is correct....how do I disconnect the wire? Do I need a special tool?

20250819_135910.jpg
 
This is what I was describing earlier. Remove the fuse and it will isolate that Red/Bk wire. Run a single wire (of similar size) from the battery and (somehow) poke it in terminal 8 (you'll need to de-pin it ). Reconnect the connector to the switch and re-test. This will prove the section of wire between fuse and light switch. You could do a volt drop check on it too (circuit loaded).
You can de-pin a terminal with a fine pick or small screwdriver. There is just a tang that needs pulling back to let the crimp slide out. Some are easier than others. That's quite a big one so it should be easy. Google a few images of various connector crimps and you'll see what you're looking for.

Just to be clear - with the switch disconnected from the terminal block, is there a draw?
 
Thanks. It will prob be the weekend before I get to try it so will let you know. If there is still a drop after Ive put the wire from the battery then I guess I'm looking at one of the leads to to lights and could pull them one by one until the drop stops.
In answer to your last question yes. With the switch disconnected from the electic connection block there is still a draw so that eliminates the actual switch.
 
In answer to your last question yes. With the switch disconnected from the electic connection block there is still a draw so that eliminates the actual switch.
Ok then there’s no need to continue.
As long as there’s no corrosion in the switch connector shorting between terminals or fraying of wires etc then the fault is on the red/bk wire between the fuse and the light switch connector.

The next job is to trace the harness until you find the issue!
(This is the point you end up lying in the footwell with your head jammed under the pedals, torch in your mouth etc!!!)

I would start at the fuse box end. If anyone has tapped into this feed, chances are it will be at this end.

It should be fairly easy to find the wire from fuse 12 hopefully.
You may find the fuse board unclips and swings down to access the rear? I’m guessing here.

So you’re looking for something obvious tied into the red/bk (like the infamous black box I mentioned) or non factory wiring!

Check the light switch end also.

Failing that, if nothing is obvious and there’s no sign of chaffing of wires then go ahead and run in the new wire from the battery.
If that proves to solve it then make it a permanent fix by either snipping the red/bk at each end and soldering in the new link or de-pin and reconnect.
 
Sounds like a lot of fun!! I'll have a look at the weekend. Its in for a service and MOT tomorrow so might even ask the garage to have a look. Ive done a lot of the time comsuming part already so at least I wont be paying for hours of their time identifying the cause. Whatever I'll post to let you know so thanks again for all your time and help!
 

Similar threads

Back
Top