Buy all your VW California Accessories at the Club Shop Visit Shop

Removal Van mode....Bench Seat removal

HectorPascal

HectorPascal

Lifetime VIP Member
Messages
309
Location
Liphook
Vehicle
T6 Ocean 150
Our family recently had a need to assist our daughter to move flats (again) and, now being retired, I offered to do this for her. I was also curious as to how practical and repeatable this might be as an exercise.

The Cali owner's manual gives little info as to the 'how', restricting its advice to a warning that if you do take it out make sure you are physically up to it.

We have all invested quite heavily in these machines so I was keen to see it 'earn its keep' if this could be done without damaging the van. Here is how I did it with help only to lift the seat out of it's rails and through the side door.

First reduce the weight of the thing. I read the bench seat is about 90 Kg naked.​
Remove the styrofoam vehicle jack/tow-ball storage unit from the rear of the bench seat and also the puncture repair pump etc which is attached to the kitchen-side of the bench seat (we have a van with no spare wheel).​
Remove the sliding storage drawer from its rails by pulling it out (after emptying it of course), removing the two small self-tappers on the floor of the drawer close to the front edge. Lift it out carefully and store it somewhere clean and dry. Then put a small piece of tape on the drawer rails to stop them sliding in and out freely.​
Slide the driver and passenger seats fully forward and wind the back rests out of the way. Also slide the bench seat back.​
Remove the grey plastic end-covers from the front of the floor rails. They clip in place and can be unclipped by gently and evenly levering them from the floor taking care to use a blunt flat tool to avoid scratching the floor and levering evenly to avoid cracking the plastic. The aluminium rail dust covers can now be slid forwards and lifted out. They might be a little stiff due to dirt/grit trapped between them and the floor. Set these parts aside - maybe in the drawer you just removed.​
This will expose the steel rails and no doubt some dirt and fluff. I took a dry paintbrush and cleaned them with a vacuum.​
You will see the cast alloy forward-stop for the bench seat which is located in the rail closest to the sink. Maybe take a picture of this before removing the screw (just loosen it off) and sliding it forward and out of the rail for safe keeping.​
Flip the head restraints back out of the way, slide the bench seat forward. I stuck a screwdriver in the hole located on the sliding-door side of the bench seat to jam the unlock lever open. (Pull the unlock handle fully out/up first and it will push in). You can now slide the seat fore and aft at will.​
At this point, before lifting the seat out of the runners (there is a gap in the runners for this), I laid some 6mm MDF on the floor between the rails to protect the surface. Two fit and able people are really needed to lift the seat carefully out of the runners and then out of the side door. We placed it on a clean dry garage floor on a sheet of MDF. Anything would do to protect the paint on the feet of the seat. The person inside the van has the hardest job lifting whilst bent over. It would be very easy to hurt your back or give yourself a groin-strain doing this so take care. Perhaps it might be possible to lift it out of the rails using the van's jack or suitable leverage but we managed okay. Once it's out of the runners it's much easier to inch it sideways and out of the van.​
Next, if you are inclined, is a cleaning job to wipe down the parts of the side walls and flooring that you can't normally reach easily.​
Reversing the above is easy enough though it is a bit of a two-person job to re-seat the drawer on its runners. We pushed the runners forward with a three-foot strip of wood (from behind the bench seat) to seat the runners properly home. You will know when they are in position because the self-tapper holes line up.​

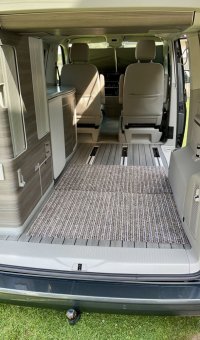
Now you have a removal van. We slid a 6'3" x 4'6" double mattress in on edge and then pushed it vertically up against the sink just to give you an idea.

Hope this of some help to some of our community.
1627641918702.jpeg
 
Our family recently had a need to assist our daughter to move flats (again) and, now being retired, I offered to do this for her. I was also curious as to how practical and repeatable this might be as an exercise.

The Cali owner's manual gives little info as to the 'how', restricting its advice to a warning that if you do take it out make sure you are physically up to it.

We have all invested quite heavily in these machines so I was keen to see it 'earn its keep' if this could be done without damaging the van. Here is how I did it with help only to lift the seat out of it's rails and through the side door.

First reduce the weight of the thing. I read the bench seat is about 90 Kg naked.​
Remove the styrofoam vehicle jack/tow-ball storage unit from the rear of the bench seat and also the puncture repair pump etc which is attached to the kitchen-side of the bench seat (we have a van with no spare wheel).​
Remove the sliding storage drawer from its rails by pulling it out (after emptying it of course), removing the two small self-tappers on the floor of the drawer close to the front edge. Lift it out carefully and store it somewhere clean and dry. Then put a small piece of tape on the drawer rails to stop them sliding in and out freely.​
Slide the driver and passenger seats fully forward and wind the back rests out of the way. Also slide the bench seat back.​
Remove the grey plastic end-covers from the front of the floor rails. They clip in place and can be unclipped by gently and evenly levering them from the floor taking care to use a blunt flat tool to avoid scratching the floor and levering evenly to avoid cracking the plastic. The aluminium rail dust covers can now be slid forwards and lifted out. They might be a little stiff due to dirt/grit trapped between them and the floor. Set these parts aside - maybe in the drawer you just removed.​
This will expose the steel rails and no doubt some dirt and fluff. I took a dry paintbrush and cleaned them with a vacuum.​
You will see the cast alloy forward-stop for the bench seat which is located in the rail closest to the sink. Maybe take a picture of this before removing the screw (just loosen it off) and sliding it forward and out of the rail for safe keeping.​
Flip the head restraints back out of the way, slide the bench seat forward. I stuck a screwdriver in the hole located on the sliding-door side of the bench seat to jam the unlock lever open. (Pull the unlock handle fully out/up first and it will push in). You can now slide the seat fore and aft at will.​
At this point, before lifting the seat out of the runners (there is a gap in the runners for this), I laid some 6mm MDF on the floor between the rails to protect the surface. Two fit and able people are really needed to lift the seat carefully out of the runners and then out of the side door. We placed it on a clean dry garage floor on a sheet of MDF. Anything would do to protect the paint on the feet of the seat. The person inside the van has the hardest job lifting whilst bent over. It would be very easy to hurt your back or give yourself a groin-strain doing this so take care. Perhaps it might be possible to lift it out of the rails using the van's jack or suitable leverage but we managed okay. Once it's out of the runners it's much easier to inch it sideways and out of the van.​
Next, if you are inclined, is a cleaning job to wipe down the parts of the side walls and flooring that you can't normally reach easily.​
Reversing the above is easy enough though it is a bit of a two-person job to re-seat the drawer on its runners. We pushed the runners forward with a three-foot strip of wood (from behind the bench seat) to seat the runners properly home. You will know when they are in position because the self-tapper holes line up.​

Now you have a removal van. We slid a 6'3" x 4'6" double mattress in on edge and then pushed it vertically up against the sink just to give you an idea.

Hope this of some help to some of our community.

View attachment 82236
Useful to know @HectorPascal but I think I would have hired a van :)
 
We recently moved house, and skipped a removals van in favour of our Beach. We had a three week overlap and 15 minute drive between the two houses, so lots of runs were possible.

I had to do school runs as well so the three seat bench stayed in the van but as we have no cupboards there was still tons of room with the bench folded and pushed forward. My memories already getting vague but I think I had about 6 foot from the camping seat storage in the tailgate to the back of the bench, and above the height of the bench there's about 7.5 feet from tailgate to drivers seat.

If I was moving anything fragile or over 6 foot I'd put the bench into bed mode along with the multiflex and lay it on the bed. There's various points on the bench that can be used to attach bungee cords and avoid stuff slipping around, for example the isofix hoops and leaving the headrests in place gives you some nice metal rods to hook stuff to.

The most restrictive element was the internal trim that runs across the top of the rear of the van - with the multiflex in place it creates quite a small opening to fit your 6ft+ furniture through. it was definitely worth measuring stuff beforehand.

We had *a lot* of stuff to move and the only thing I didn't move in the van was some garden plants that were over 6 foot tall and would have scratched the roof. Fortunately I also didn't have a three-seat sofa to move, we wouldn't have fitted one in with the bench still in the van.
 
I agree the biggest constraint is the airline style locker above the rear seats, does a masterful job of preventing you from putting anything large in!

I hired a van in the end, 50 quid well spent in my eyes.
 
Our family recently had a need to assist our daughter to move flats (again) and, now being retired, I offered to do this for her. I was also curious as to how practical and repeatable this might be as an exercise.

The Cali owner's manual gives little info as to the 'how', restricting its advice to a warning that if you do take it out make sure you are physically up to it.

We have all invested quite heavily in these machines so I was keen to see it 'earn its keep' if this could be done without damaging the van. Here is how I did it with help only to lift the seat out of it's rails and through the side door.

First reduce the weight of the thing. I read the bench seat is about 90 Kg naked.​
Remove the styrofoam vehicle jack/tow-ball storage unit from the rear of the bench seat and also the puncture repair pump etc which is attached to the kitchen-side of the bench seat (we have a van with no spare wheel).​
Remove the sliding storage drawer from its rails by pulling it out (after emptying it of course), removing the two small self-tappers on the floor of the drawer close to the front edge. Lift it out carefully and store it somewhere clean and dry. Then put a small piece of tape on the drawer rails to stop them sliding in and out freely.​
Slide the driver and passenger seats fully forward and wind the back rests out of the way. Also slide the bench seat back.​
Remove the grey plastic end-covers from the front of the floor rails. They clip in place and can be unclipped by gently and evenly levering them from the floor taking care to use a blunt flat tool to avoid scratching the floor and levering evenly to avoid cracking the plastic. The aluminium rail dust covers can now be slid forwards and lifted out. They might be a little stiff due to dirt/grit trapped between them and the floor. Set these parts aside - maybe in the drawer you just removed.​
This will expose the steel rails and no doubt some dirt and fluff. I took a dry paintbrush and cleaned them with a vacuum.​
You will see the cast alloy forward-stop for the bench seat which is located in the rail closest to the sink. Maybe take a picture of this before removing the screw (just loosen it off) and sliding it forward and out of the rail for safe keeping.​
Flip the head restraints back out of the way, slide the bench seat forward. I stuck a screwdriver in the hole located on the sliding-door side of the bench seat to jam the unlock lever open. (Pull the unlock handle fully out/up first and it will push in). You can now slide the seat fore and aft at will.​
At this point, before lifting the seat out of the runners (there is a gap in the runners for this), I laid some 6mm MDF on the floor between the rails to protect the surface. Two fit and able people are really needed to lift the seat carefully out of the runners and then out of the side door. We placed it on a clean dry garage floor on a sheet of MDF. Anything would do to protect the paint on the feet of the seat. The person inside the van has the hardest job lifting whilst bent over. It would be very easy to hurt your back or give yourself a groin-strain doing this so take care. Perhaps it might be possible to lift it out of the rails using the van's jack or suitable leverage but we managed okay. Once it's out of the runners it's much easier to inch it sideways and out of the van.​
Next, if you are inclined, is a cleaning job to wipe down the parts of the side walls and flooring that you can't normally reach easily.​
Reversing the above is easy enough though it is a bit of a two-person job to re-seat the drawer on its runners. We pushed the runners forward with a three-foot strip of wood (from behind the bench seat) to seat the runners properly home. You will know when they are in position because the self-tapper holes line up.​

Now you have a removal van. We slid a 6'3" x 4'6" double mattress in on edge and then pushed it vertically up against the sink just to give you an idea.

Hope this of some help to some of our community.

View attachment 82236
hey there, so it was easy enough to remove the drawer under the rear seat bench? I need to store my surfboard somewhere when travelling with the family.
 
Back
Top