Buy all your VW California Accessories at the Club Shop Visit Shop
Installing dual mppt leisure and starter battery charger

McSnuff

McSnuff

Lifetime VIP Member
Messages
63
Location
Ramsgate
Vehicle
T6 Beach 150
Hi

I purchased solar from Roger last week and have time today to finish my install .

I have run the cable but stuck on where the brown cable in pic attaches to the starter relay ? Also where does the other end go ?

As you can tell this isn't my profession

16193590209176399182110075119346.jpg
 
It goes on the split charging relay as per the instructions, but that's isn't in shot. Is it over on the left? A photo of the relay is in the instructions. The other end goes into batt 2 + on the Epever Duo, covered in the instructions. Did you not get a complete set of instructions? I'll email you a copy when I'm at my desk.

R
 
Hi again - a pic of the relay - I believe it's on the other side side on the beach - nearest the door.

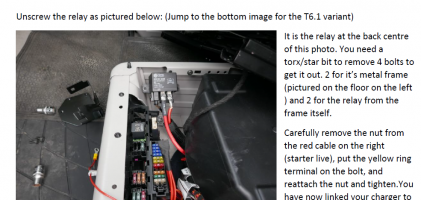
The relay is easy to find as there will be a big chunky red wire going from your battery to it, and then another similar wire going from the relayunder the floor (tounder the bonnet eventually)

(something is a bit different in your van as those bank of 4 blue fuses in black holders are not standard)

1619425494753.png
 
The beach split charge relay is the one that has 100 written on the top
 
Hi Roger

here is another view / pic

Sorry Paul_f just seen your reply so amended pic, is it the the highlighted 100 ?

battery_LI.jpg
 
If that's the relay, and I don't doubt Paul, then I'll need to see the underside so I can make you a patch cable. It looks like you are the 1st person to install an Epever Duo charger in a Beach from us.

See if the relay unclips, with its wires attached. It looks from here like it is held in place with two plastic clips.

Once I know I can make you a cable - I veyr much doubt it has 6mm screw posts like the relays I'm used to. More likely spade connectors - but that woudl be unusual for 100amps! - perhaps it does have 6mm screw terminals?

Just be careful - the cables attached to it will be live to your starter battery, and your leisure battery. DOn't touch them on anything metal.

I'm off out now so any relies won't be until much later.
 
Here is a modified relay to act as a take off for a DCDC charger

IMG_20210330_205423.jpg
 
That looks like the ticket!

That's going to be fun interfacing with...

It might be easier to see if the starter live goes anywhere more easy to tap into.

On that plug there are two power feeds - going to purple and black. You should be able to follow one of them back to the battery where you are. That is the leisure battery feed. We want to follow the other one (let me know which colour for reference) and see if it has any more accesisble points - I suspect it won't and it will simply dissapear in to the floor.

If that's the case then you are probably going to be better off running the cable to under the bonnet and connecting directy to the starter battery positive . I can't easily make a cable for that relay - I don't have the parts or tooling.

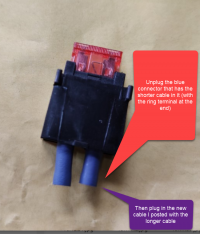
I'll put a cable in the post today that will plug into the red fuse holder, replacing the cable with the ring terminal on it - with a longer version - long enough to get to the starter battery.

Sorry for the hassle. I've not had to deal with the Beach relay so it's new to me. I assumed it would share the relay with all the other models, but it clearly does not.

I think for your instance, it's going to be easier and safer to run the cable into the engine bay, negating the need to interfere with the relay socket/plugs. I had a quick google aout how to do this and read that there are several existing grommets in the bulkhead/firewall that allow easy passage of a cable from engine bay to cab.

Quote "
You dont need to drill anything, there are existing holes blanked of with rubber grommets already there that you can use
If you go under the glovebox and pop the lower panel off and fold the edge of the flooring back if you look back and up under the outside edge of glovebox you should be able to see one, this hole brings you out behind battery/below scuttle tray"

Regardless of which way you do this, I'll put a cable extension in the post today.
 
Hi Roger

I believe the purple goes into the fuse (1st pic) and the black cable goes into this covering and through the floor (2nd pic)

sol2_LI.jpg

sol_LI.jpg
 
Morning Roger

Just received the new cable in the post thanks, shall I run it from the charger through to the starter battery under the bonnet?
 
Indeed - you have already run the cable to under the passenger seat, so in teh base of the fuse holder that I provided, pull the blue connector that leads to the ring terminal, and replace it with the new one I supplied on a longer cable. That way you are still fused, and you now have a longer cable to run to under the bonnet.

1619519555584.png

I've just installed a kit on a Beach and the relay is fiddly - it's not something I'd make a cable to tap into - it would cause far too many problems. If it were me personally, I'd cut and splice into the big red live - but that's not something most people can do safely at home.

I also checked the big brown fuse and it goes to the leisure battery, not the starter, which is a shame as I coudl have used a piggyback fuse holder to tap into it.
 
Last edited:
Indeed - you have already run the cable to under the passenger seat, so in teh base of the fuse holder that I provided, pull the blue connector that leads to the ring terminal, and replace it with the new one I supplied on a longer cable. That way you are still fused, and you now have a longer cable to run to under the bonnet.

View attachment 77468

I've just installed a kit on a Beach and the relay is fiddly - it's not something I'd make a cable to tap into - it would cause far too many problems. If it were me personally, I'd cut and splice into the big red live - but that's not something most people can do safely at home.

I also checked the big brown fuse and it goes to the leisure battery, not the starter, which is a shame as I coudl have used a piggyback fuse holder to tap into it.
I was going to order a solar panel from you for my 6.1 beach camper, is it quite a tricky install then on the beach?
 
Not at all. The issues above are related to the Epever Duo charger connection to the starter battery in a Beach, which I've not dealt with before. Most people order the Victron 75/15 for the beach, which simply connects to the leisure battery with two ring terminals.

Plenty of people on here have posted threads on their Beach installations.

R
Ok superb, was the victron I was going to order
 
Just an update , I run the supplied cable under the seat through the attached grommet and into the battery , hopefully I am done , I have attached some pics of the MPPT charger just to make sure

3.jpg

2.jpg

1.jpg

6.jpg

8.jpg

9.jpg

10.jpg

11.jpg

12.jpg

13.jpg
 
In the workshop so on my phone but it looks good at a glance
 
On a beach 2 battery setup - Which battery gets priority , or, are they charged in parallel?
 
The Epever Duo uses a scoring system. Batt1 is Leisure, Batt 2 starter.

Batt1 gets all the charge, unless :

Batt1 is full, and there is spare energy.
Batt1 is charging but there is still spare energy.
Batt2 is below a set voltage,

Batt2 only gets 1 amp max (it gets charged PWM style).

They do get charged in parallel at times.
 
I am intrigued (or even dismayed) to see +12v potential wires coloured brown. Brown is the DIN standard for -ve chassis ground potential!

Or have I misunderstood some of the pictures? Apologies if I have.
 
We switched from thinwall to regular thick wall with the starter battery live as it takes a route that can get crushed in a limited set of circumstances, so wanted the extra insulation thickness.

At the same time I wanted to use a different colour to differentiate the cable from the others in the kit that use red as positive so the installation procedure is not confusing, having to back-trace wires.

British automotive cabling has brown as positive. British domestic cabling has brown as live. So I feel brown is a reasonable choice. The cable has a fuse on the end that is 45 cm from the connector so it is obvious to all that it is positive.

I'm afraid your dismay may turn to aghasteness(?) when I tell you that brown is out of stock everywhere so the next lot of kits will have a blue wire.
Sorry to have picked this up, it's just that I have a low voltage electrical background and have been a VW owner for over fifty years so think Brown -ve chassis earth automatically even to the extent that I have to be very careful when working with 240v mains cable not to get it wrong!
Quite why Europe and us in GB have opted to use Brown for 240v live when the automotive industry in Europe was already using brown for chassis ground for decades.

I don't know who your suppliers are but in the past I have used...

AES at Tenbury Wells - https://www.autoelectricsupplies.co.uk/
and
Vehicle Wiring Products at Ilkeston - https://www.vehiclewiringproducts.co.uk/

Like you I am always very careful about possible chaffing of wires and often opt to use additional sleeving for both singles or looms where not obviously necessary.

As for blue wire, no problem to me as it doesn't look like an earth cable. I suspect in DIN terms blue has some reference to control or sensing circuit use but hey-ho we can only use what we can get.
 
Back
Top